Note: These Descript features are just the beginning. There'll be more to come. As such, keep checking this blog post regularly for updates.
Ever tried to do videos and then realized that you spend more time editing videos than actually creating them?
As it were, I am scared to do videos. Add the editing burden to videos and I’d lose interest faster than you’d read this paragraph.
Descript was made for people like us (and even the pros, really). Descript helps you do magical things with video and audio.
You only have to try it on for size.
Read:
I’ve written a post introducing Descript, how it works, and more (just an overview).
But Descript doesn’t just do what you think it does. There’s a lot more under the hood than we know.
Here are a few things Descript does that most people aren’t aware of:
Remove Filler Words & Shorten Gaps In Speech
As it were, I am terrible at making videos. Editing videos? That’s another sore thing that practically stops me in my tracks where creating videos are concerned. I hate editing and I don’t like to waste time on editing at all.
Major part of my editing involves cutting out filler words, awkward sounds I probably make while talking on videos, and so on. If I take 20 minutes to create a video, I probably end up spending more than an hour just going back and forth trying to weed out these filler words and other nonsense in the video.
Imagine that: Time for each video -- upwards of at least 2 hours.
How do you save at least 2 hours per video (multiply that with the number of videos you create now)?
Use the “One-click” option to remove filler words and shorten gaps with Descript. Once your transcript is complete and ready, use the “wrench icon” on the top of your Descript workspace and automatically remove filler words such as “Umms” and “Ahhs”.
Plus, grab the option to shorten gaps -- anything that resembles silence -- and make your videos or audios crisp.
Studio Sound [For Studio Level Sound]
Studio Sound is a new feature in Descript using which you can remove background noise, enhance speech, and sound like a pro with acoustic echo cancellation and audio quality enhancement, with just one click (or choosing Studio Sound to begin with, before recording).
With audio restoration features, it can remove audio imperfections, remove echo from sound, and more - without you having to bench press with another audio or video editing software.
Descript’s Studio Sound feature does all this by isolating speakers’ voices, then regenerates and enhances the audio quality while removing echo and background noise.
Learn more about Descript Studio Sound in this video
Use Overdub In Descript to Add Content [In Your Voice]
One of the most powerful features that Descript provides is the ability to add “voice” in your video or audio with “text”. Like, type something in or add a piece of text to your transcript and that bit of content is added to your video (by using your own voice).
Overdub in Descript allows you to record your voice (in addition to each team member’s voice).
Can you imagine what you can do with this? You could add extra layers of content -- a forgotten line, a call to action, or something you missed while shooting your video just by adding a line or a paragraph into your transcript.
Add Your Brand Logo (or other graphics) To Videos
Most people -- even those that use Descript -- are not aware of this: you can add logos, other graphics, and any sort of media really -- to your videos especially. You could also make your logos appear at certain parts of the video (and then fade out). Or you could leave the logo showing where you want it to show for the entire duration of the video.
To add a logo(or other graphics) to videos. Just drag and drop your file into the transcript (always available in the Drive or Workspace), exactly where you want the file to appear. You can then apply cross fading effects or transition effects if you want the logo or graphics to disappear later.
Add lower thirds to Regular Videos [Not Just live streams]
When you do live streams, lower-thirds are critical to graphically display certain aspects of live streams -- such as names of hosts and guests, short snippets of information, highlighting comments, displaying questions your audience members ask, and more.
But those are live streams and several tools such as Restream do have built-in tools to allow you to customize and use lower-thirds.
What about regular videos? How about using lower-thirds for normal screen share recordings or talking head videos?
You’d have to do heavy-lifting (bench press?) with Adobe Premiere Pro or Final Cut to bring in such video effects.
Not with Descript. Did you know that you can create simple, on-brand lower-thirds with Descript, right within your regular Descript workspace itself?
Create Progress Bars With Descript
Great going with adding lower-thirds to your videos. Now, how about adding something cool like a progress bar for your videos, edited with Descript?
Progress bars are a great visual way to show where your viewers are on the video and how much longer the video is.
You could easily add a progress bar (customized with your brand colors) to your videos within Descript.
Add, Fade, CrossFade in Descript
Any media you add to Descript -- be it standalone audio files (as in Podcasts maybe?), audio within video files, images, music, and so on -- come with options for you to add, delete, and fade media (at certain points in your editing timeline).
You can add media by clicking over, pointing your cursor at any section of the transcript within Descript and follow through.
Crossfade feature in Descript allows you to add media, fade out music after a few seconds (to allow for the speech to be heard clearly), or to help show logos (or make them disappear after a while).
Drop Music [With CrossFade and Volume Management]
Just like you’d add logos and graphics (above), you can also use music. Use music files (or parts of a file) at certain parts of your audio or video. Further, just as it is with other media, you can make changes to exactly how your music plays (full volume, or faint play in the background, or play and fade).
Select your music files from your computer, drag the file, drop the file at the part of your transcript (or select the entire transcript) where you want music to play, and that’s about it.
In the timeline (shown in Descript workspace), you can edit the file to dissolve, fade, or play in full.
Repurpose Your Videos and Audio Content Easily
Let’s say you just went live across channels such as LinkedIn, Facebook, Twitter, and YouTube.
You’ll now have an entire recording of the live stream available to you.
Reuse the live stream recording in several ways:
- Keep the live stream as recordings, available for replay, on platforms like YouTube.
- Make your previous live stream recordings available “On Demand” by letting your potential audiences or customers sign up to receive previous live streams.
- Split individual live streams into various other videos -- for sharing on social media, for using as native social videos, or
- Create and sell digital products which you can later sell using Payhip, Podia, or Thinkific.
However, it’s hard work to repurpose videos, audio files, live streams, and anything else. With Descript, this work just gets easier (and faster).
Thanks to the transcripts inside Descript, you could just select parts of the transcript, copy it, paste it into a new composition window, and spin it off as a new video or audio.
Decrease background noise With Ducking
If you have a problem with ambient noises aplenty -- including air conditioners, fans, dogs in the background, and so on, you could use Studio Sound (above). Or you could use Studio Sound + recordings and edit these recordings using video editing software (if you want to).
Or, use Descript’s Ducking feature.
Make your voice shine through (without these ambient noises or background noise. Descript Ducking allows you to automatically lower the volume of other parts of your audio composition as long as there’s a speech clip present in your audio tracks.
To use Descript Ducking, open the clip inspector (right hand side of Descript’s composition window), “track properties”, + Add Effect and select Ducking.
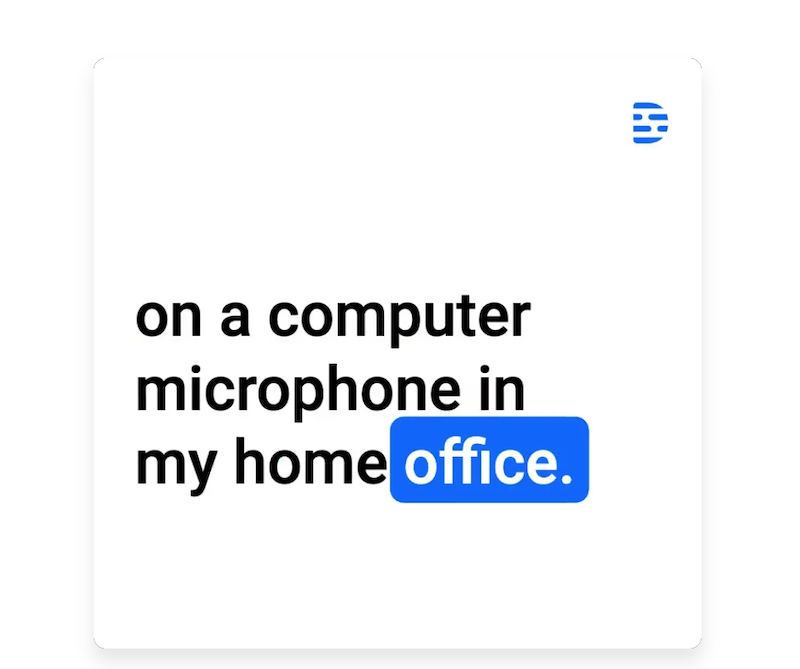
Use Audiograms For Social Media
Audiograms are all the craze on social media. I am certain you’ve seen one of these on Twitter or LinkedIn -- where there’s a graphical representation of audio being played, along with a colored highlighter running along the script/text to flow with the voice in the audio.
You don’t need to get any new tools or dabble with anything else if you have a Descript account.
Descript has audiograms that you could use to share on social media, embed in your blogs, and more.
While simplistic and with limited audiogram templates, it’s more than enough if you are just getting started.
Here’s an example of an Audiogram that Madalyn Sklar posted a while ago:
This is what an Audiogram looks like:
Learn how to do all of these with Descript, straight from the source. Watch this video to learn how to execute on these tips:
Get Descript for Free. Use it for Free. Thank me later.