Learn how to use the Meta Business Suite (previously: Facebook Business suite) & to control and manage all your brand properties such as Facebook business page(s), Instagram Account(s), and WhatsApp account(s) for your brand/business or multiple brands and business.
Looking for the best resources to learn about Facebook Ads. From the Pros
🔥 Download this free eBook Now.
Why, you ask?
Because, it’s too big to ignore. [You don’t have to agree, like it, or hate it]. It’s just business, remember?
According to Nicola Wynn of Podia — as of 2021 — Facebook has an estimated 1.93 billion daily active users and 2.89 billion monthly active users.
Meta Business Suite was purpose-built to help you manage not just your own Facebook brand page, Instagram account for brand, or the WhatsApp account you’d use for your business but also manage other brands (that you own or might have to such as when you are managing other brands).
Watch the video
Here are a few steps to help you:
Step #1: Access Meta Business Suite
Step #2: Add Web properties & Facebook Assets
Step #3: Access Brand-specific Interfaces
Step #4: Manage Your Brands (Toggle & Switch)
Step #5: Take Control Of Your Accounts
Step#1: Go to Meta Business Suite
Unlike your personal profile, you’d have to specifically go to the Meta Business Suite and login using your Facebook credentials (your usual Facebook logins).
The link you need is: https://business.facebook.com (and not the usual Facebook.com that you’d access your personal Facebook account).
If it’s a new browser, Meta will ask you to identify yourself either with a code authenticator or by sending you a verification code to your mobile phone associated with your account.
Step #2: Add Assets (Pages, Instagram Accounts, WhatsApp Accounts)
Once you are inside the Meta Business Suite, you’ll automatically be prompted to add/create the following:
- Create/add/claim Your Facebook business page
- Create/add/claim an Ad account (it’s a separate entity for Meta’s purposes and you’d need to create a new one if you don’t have it yet).
- Create/Add/Claim your Instagram account
- Assign roles to people (admin, collaborator, Ad manager, etc.) — valid even if you are the only one managing all your brands, ad accounts, and other properties.
All of this process pertains to “ONE” brand or business at a time. If you have multiple businesses or brands, you’d have to repeat the process (above) for each of the other brands as well (and be sure to assign people — even if it’s just you).
The automatic prompts are one way to add Facebook business page, Instagram account, and WhatsApp account (on top of ad accounts, people, etc.) to your Meta Business Suite.
Or, you can do it manually by clicking on settings (bottom of the left side panel as shown), go to “Business assets> Add Assets” or “Business Settings and Add accounts“
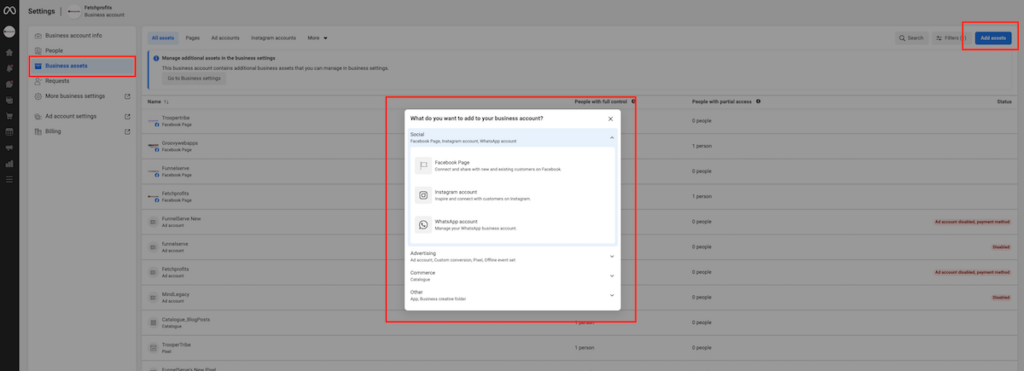
Step #3: Brand Specific Management Interface
Once you have your accounts gathered within Meta Business Suite, this is how it’ll look like:
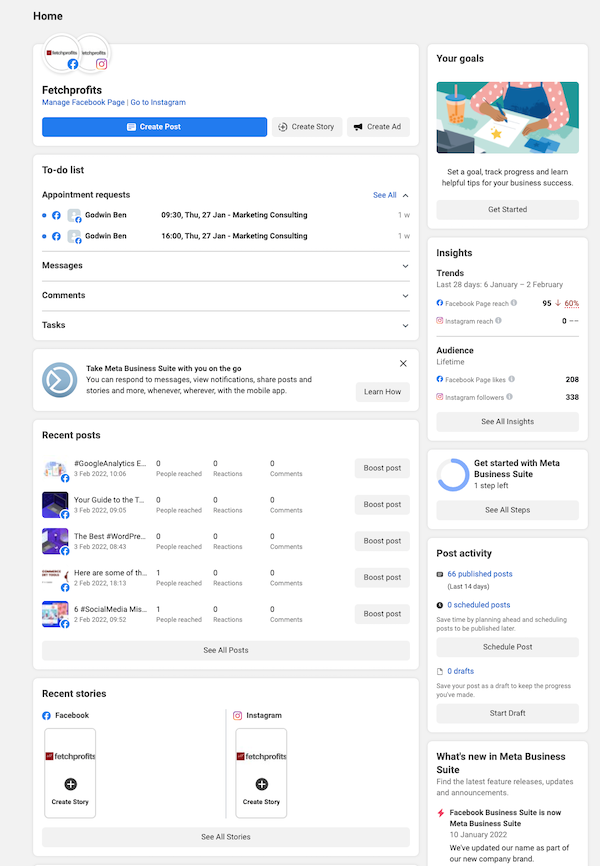
For each of the businesses or brands you’ve set up within Meta Business Suite, you’ll be able to access various tools within (left side panel).
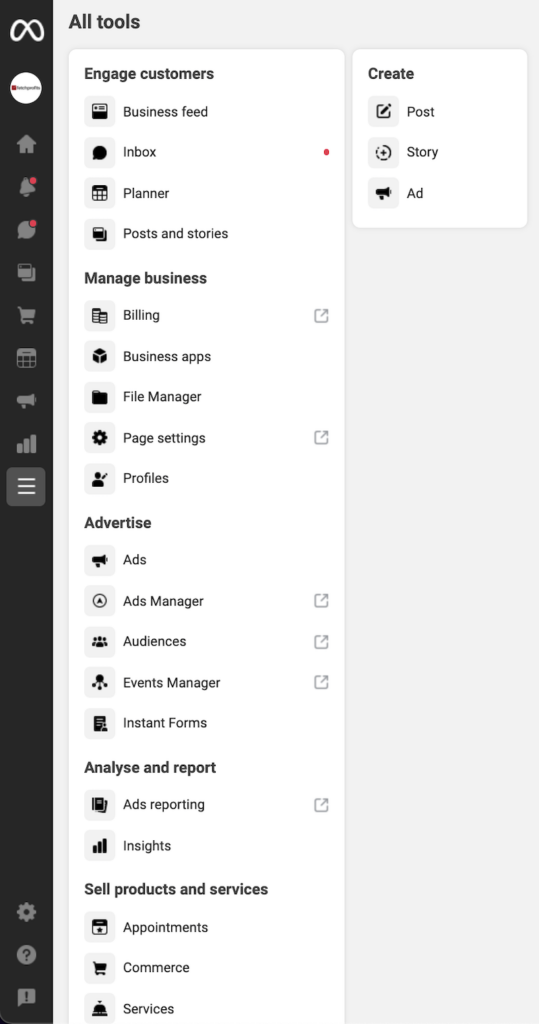
You’ll have access to various tools and Meta Business Suite features Such as:
- Ads management (Facebook Ads, Instagram Ads)
- Insights and Analytics
- File manager
- Appointments, Services, Products
- Commerce
- Inbox (unified inbox that shows you messages you receive from across Meta’s properties such as Facebook page messages, Instagram Direct, Facebook Messenger, Facebook comments, and Instagram comments.
- Post planner (Post, update, manage, or schedule Facebook posts, Facebook stories, Instagram posts, Instagram stories, e.t.c).
- Tasks
- and more..
Step #4: Manage Multiple Brands (Meta Business Suite)
If you are like me, you might have multiple brands you’d have to manage. Each brand will have its own Facebook business page, Instagram account, and WhatsApp account.
Each account (brand or business) will have a single interface as shown above.
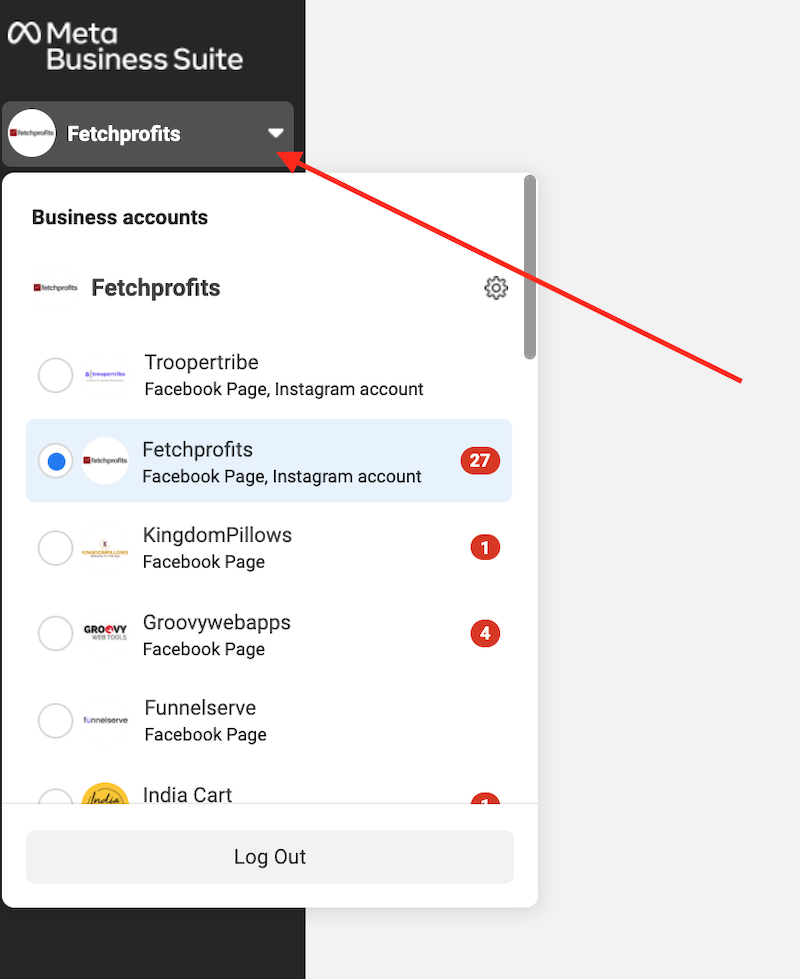
To be sure to be on the right account (while having to manage any of the brands in question), be sure to toggle and select the appropriate account on the top of the left side panel within Meta Business Suite (as shown).
Read:
7 Ways To use Facebook for Small Businesses & Content Creators
Step#5: Own your accounts, Stay in Control
Too many brands and businesses I work with let others (like freelancers, in-house team members, and agencies) create/manage their main Facebook/Instagram account pages.
Shockingly, most business owners don’t even have access to their own Facebook business page or Instagram.
Don’t let this happen to you.
Be sure to have complete control
- Create/Claim your Facebook business page
- Create/Claim your Instagram account
- Be sure to use “your email address” and “your phone number” to access your accounts.
- If you ever have to hire someone else to manage your accounts, use the “people option” inside business settings to assign various roles.
Let me know how this setup goes for you.
Read:
Shopify’s Guide On How to Use Meta Business Suite
Follow my Facebook Business Page, or Instagram, or Join my community on LinkedIn.

